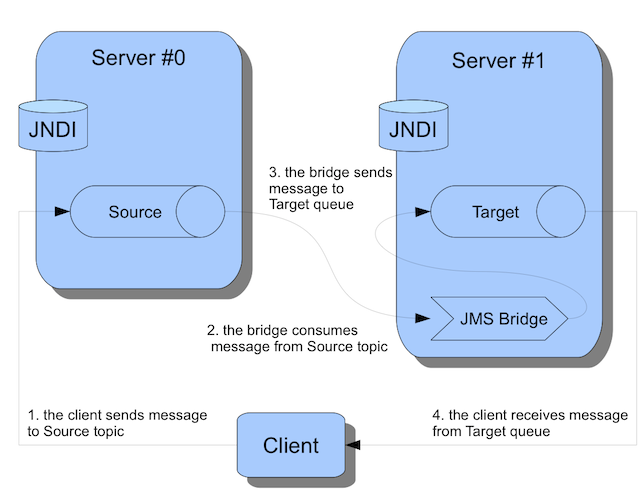
This example shows you how to create a JMS Bridge between two ActiveMQ servers.

The example will use two ActiveMQ servers:
/source/topic
/target/queueBoth ActiveMQ server will run their own JNDI server used by the JMS Bridge and the JMS Client to lookup JMS resources (ConnectionFactory and Destination).
The JMS Bridge will be started in the example code and be configured to bridge messages from the source destination (the topic hosted on server #0) and the target destination (the queue hosted on server #1)
The client will check the bridge works by:
The JMS Bridge is a POJO that we configure with both source and target JNDI configurations. In the actual example we are programatically creating the Bridge, however the following section describes how you would do this if you wanted to deploy with an actual ActiveMQ server via the activemq-beans.xml.
in which we inject JNDI configurations so that it looks up its source and target JMS resources. The JMS Bridge is defined a bean and setup by JBoss Microntainer in the same VM than Server #1, the target server.
The JMS Bridge sample configuration can be found inresources/activemq-beans.xml, firstly we define the
Bridge itself:
         <!-- The JMS Bridge -->
         <bean name="JMSBridge" class="org.apache.activemq.jms.bridge.impl.JMSBridgeImpl">
         ...
         </bean>
the JMSBridgeImpl constructor is used to inject all the properties required to run the JMS Bridge.
Its first four arguments defines how the bridge will lookup:
Using other POJOs, the JMS Bridge is configured to retrieve:
/source/ConnectionFactory using
the SourceJNDI configuration/source/topic using
the SourceJNDI configuration/target/ConnectionFactory using
the TargetJNDI configuration/target/queue using
the TargetJNDI configurationIn turn, SourceJNDI and TargetJNDI are POJOs defining how to connect to JNDI server.
SourceJNDI URL must point to your source server, while LocalJNDI must point to your target server:
      <bean name="SourceJNDI" class="java.util.Hashtable">
         ...
                <entry>
                   <key>java.naming.provider.url</key>
                   <!-- **************************************** -->
                   <!-- Replace with the *source* server address -->
                   <!-- **************************************** -->
                   <value>jnp://192.168.0.10:1099</value>
         ...
       </bean>
       <bean name="TargetJNDI" class="java.util.Hashtable">
         ...
                <ntry>
                   <key>java.naming.provider.url</key>
                   <!-- **************************************** -->
                   <!-- Replace with the *target* server address -->
                   <!-- **************************************** -->
                   <value>jnp://1192.168.0.11:1099</value>
                </entry>
         ...
       </bean>
To run the example after having setup both ActiveMQ servers and the JMS bridge:
mvn verifyLet's look at the Client code (in JMSBridgeExample class):
           InitialContext sourceContext = createContext(sourceServer);
           InitialContext targetContext = createContext(targetServer);
            JMSBridge jmsBridge = new JMSBridgeImpl(
               new JNDIConnectionFactoryFactory(sourceJndiParams, "/source/ConnectionFactory"),
               new JNDIConnectionFactoryFactory(targetJndiParams, "/target/ConnectionFactory"),
               new JNDIDestinationFactory(sourceJndiParams, "/source/topic"),
               new JNDIDestinationFactory(targetJndiParams, "/target/queue"),
               null,
               null,
               null,
               null,
               null,
               5000,
               10,
               QualityOfServiceMode.ONCE_AND_ONLY_ONCE,
               1,
               -1,
               null,
               null,
               true);
            jmsBridge.setTransactionManager(new TransactionManagerImple());
            ....
        jmsBridge.start();
           ConnectionFactory sourceConnectionFactory = (ConnectionFactory)sourceContext.lookup("/source/ConnectionFactory");
           Topic sourceTopic = (Topic)sourceContext.lookup("/source/topic");
           sourceConnection = sourceConnectionFactory.createConnection();
           Session sourceSession = sourceConnection.createSession(false, Session.AUTO_ACKNOWLEDGE);
           MessageProducer sourceProducer = sourceSession.createProducer(sourceTopic);
           TextMessage message = sourceSession.createTextMessage("this is a text message sent at " + System.currentTimeMillis());
           sourceProducer.send(message);
sourceConnection.close();
At this point, the JMS Bridge will consume the message from the source topic and sends it to the target queue. The client will check the bridge works by consuming a message from the target queue.
           ConnectionFactory targetConnectionFactory = (ConnectionFactory)targetContext.lookup("/target/ConnectionFactory");
           Queue targetQueue = (Queue)targetContext.lookup("/target/queue");
           targetConnection = targetConnectionFactory.createConnection();
           Session targetSession = targetConnection.createSession(false, Session.AUTO_ACKNOWLEDGE);
           MessageConsumer targetConsumer = targetSession.createConsumer(targetQueue);
targetConnection.start();
TextMessage messageReceived = (TextMessage)targetConsumer.receive(5000);
           System.out.format("Message ID         : %s\n", messageReceived.getJMSMessageID());
           System.out.format("Bridged Message ID : %s\n", messageReceived.getStringProperty("HQ_BRIDGE_MSG_ID_LIST"));
Note that the message received from the target queue is not the same message sent to the source topic (their message IDs are different) but they have the same content.
finally block. Closing a JMS connection will automatically close all of its sessions, consumers, producer and browser objects
           finally
           {
              if (jmsBridge != null)
              {
                jmsBridge.stop();
              }
              if (initialContext != null)
              {
                initialContext.close();
              }
              if (connection != null)
              {
                 connection.close();
              }
           }