 ## Used SharePoint Framework Version

## Applies to
* [SharePoint Framework Developer](http://dev.office.com/sharepoint/docs/spfx/sharepoint-framework-overview)
* [Office 365 developer tenant](http://dev.office.com/sharepoint/docs/spfx/set-up-your-developer-tenant)
## Solution
Solution|Authors
--------|-----------
react-content-query-webpart|Simon-Pierre Plante
## Version history
Version|Date|Comments
-------|----|--------
1.0.0|May 04, 2017|Initial release
1.0.1|July 23rd 15, 2017|Updated to GA Version
1.0.3|August 12, 2017|Added external scripts functionnality
1.0.4|August 31, 2017|Fixed a bug where tenant sites/subsites were missing from the **Web Url** dropdown
1.0.5|September 1st, 2017|Added a **Site Url** parameter next to the **Web Url** parameter in order to narrow down the results
1.0.6|September 19, 2017| Upgraded to SharePoint drop 1.2.0 and added the site url and web url preselection when adding the WebPart for the first time on a page. Also fixed a bug with fields that had spaces in their internal names (automatically replaced with `_x0020_` by SharePoint).
## Disclaimer
**THIS CODE IS PROVIDED *AS IS* WITHOUT WARRANTY OF ANY KIND, EITHER EXPRESS OR IMPLIED, INCLUDING ANY IMPLIED WARRANTIES OF FITNESS FOR A PARTICULAR PURPOSE, MERCHANTABILITY, OR NON-INFRINGEMENT.**
## Features
### Cross site collection
The WebPart uses the search in order to get all sites under the current domain, which makes it possible to query not only subsites but other site collections and their subsites as well. By default, the current site collection and the current web on which the user is adding the WebPart will be pre-selected automatically.
## Used SharePoint Framework Version

## Applies to
* [SharePoint Framework Developer](http://dev.office.com/sharepoint/docs/spfx/sharepoint-framework-overview)
* [Office 365 developer tenant](http://dev.office.com/sharepoint/docs/spfx/set-up-your-developer-tenant)
## Solution
Solution|Authors
--------|-----------
react-content-query-webpart|Simon-Pierre Plante
## Version history
Version|Date|Comments
-------|----|--------
1.0.0|May 04, 2017|Initial release
1.0.1|July 23rd 15, 2017|Updated to GA Version
1.0.3|August 12, 2017|Added external scripts functionnality
1.0.4|August 31, 2017|Fixed a bug where tenant sites/subsites were missing from the **Web Url** dropdown
1.0.5|September 1st, 2017|Added a **Site Url** parameter next to the **Web Url** parameter in order to narrow down the results
1.0.6|September 19, 2017| Upgraded to SharePoint drop 1.2.0 and added the site url and web url preselection when adding the WebPart for the first time on a page. Also fixed a bug with fields that had spaces in their internal names (automatically replaced with `_x0020_` by SharePoint).
## Disclaimer
**THIS CODE IS PROVIDED *AS IS* WITHOUT WARRANTY OF ANY KIND, EITHER EXPRESS OR IMPLIED, INCLUDING ANY IMPLIED WARRANTIES OF FITNESS FOR A PARTICULAR PURPOSE, MERCHANTABILITY, OR NON-INFRINGEMENT.**
## Features
### Cross site collection
The WebPart uses the search in order to get all sites under the current domain, which makes it possible to query not only subsites but other site collections and their subsites as well. By default, the current site collection and the current web on which the user is adding the WebPart will be pre-selected automatically.


MyField value : {{MyField}}
[object]
[object]
[object]
```
We are almost there, the above code is rendering a *[object]* because the Content Query Webpart offers 3 different ways to render a field value:
Property | Description
---------|---------------
{{MyField.textValue}} | Renders the text value of the field, a more readable end-user value to use for display.
{{MyField.htmlValue}} | Renders the HTML value of the field. For example, a *Link* field HTML value would render something like \My Link Field\
{{MyField.rawValue}} | Returns the raw value of the field. For example, a *Taxonomy* field raw value would return an object which contains the term wssId and it's label
*Handlebars : *
```handlebars
{{#each items}}
MyUserField text value : {{MyUserField.textValue}}
MyUserField html value : {{MyUserField.htmlValue}}
MyUserField raw value : {{MyUserField.rawValue}}
MyUserField text value : Simon-Pierre Plante
MyUserField html value : Simon-Pierre Plante
MyUserField raw value : 26
### Including your own external scripts and/or block helpers #### Including basic library files For including JavaScript files within the WebPart, file URLs must be added to the **External Scripts** parameter available in the toolpart.
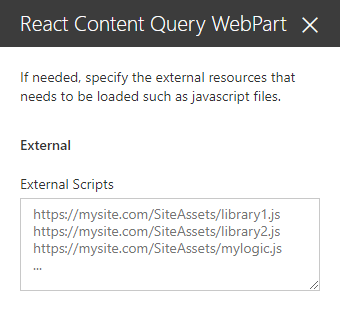 Each file URL must be on its own line, and placed in the desired order. The scripts will be loaded asynchronously, but in a sequential fashion, which means that the WebPart will wait until a script is completely loaded before proceeding to load the next one.
#### Including custom logic files
If you need custom logic files that can interact precisely **before** or **after** the rendering of the HTML generated by the *Handlebars* template, you must follow the patern below in order for the WebPart to recognize the endpoints and call them when needed :
```javascript
ReactContentQuery.ExternalScripts.MyScriptFile = {
onPreRender: function(wpContext, handlebarsContext) {
// Do someting before rendering (ie: adding a custom block helper)
},
onPostRender: function(wpContext, handlebarsContext) {
// Do something after rendering (ie: calling a plugin on the generated HTML)
}
}
```
Looking at this example, here are the key things that needs to be respected in order for the file to work :
_Namespace_
- [x] The script uses a namespace which starts by **ReactContentQuery.ExternalScripts.**, followed by the name of its own file
- [x] The name of the file has to be written without its **.js** extension, and without any caracters that aren't letters or numbers
- [x] The name of the file needs to respect the same casing as in it's URL
Examples :
*https://www.mysite.com/MyScript.js*
```javascript
ReactContentQuery.ExternalScripts.MyScript {
...
}
```
*https://www.mysite.com/_My-Funky*named*Script_.js*
```javascript
ReactContentQuery.ExternalScripts.MyFunkynamedScript {
...
}
```
_Functions_
- [x] The script implements the **onPreRender** function for code that has to be executed before rendering
- [x] The scripts implements the **onPostRender** function for code that has to be executed after rendering
Both functions provide the following parameters :
Parameter | Description
----------------------|-------------
**wpContext** | Represents the context of the WebPart who called the function, which exposes all kinds of usefull informations such as **wpContext.domElement** which represents the HTML element on which the current WebPart is being rendered.
**handlebarsContext** | Represents the handlebars context used for generating the template of the current WebPart. Can be used for adding handlebar block helpers in the **onPreRender** function for example.
#### Including custom block helpers
Custom *block helpers* that can be used directly within the *Handlebars* template can be added simply by using a custom logic script file that implements the **onPreRender** function.
Example:
*https://www.mysite.com/MyCustomBlockHelper.js*
```javascript
ReactContentQuery.ExternalScripts.MyCustomBlockHelper = {
onPreRender: function(wpContext, handlebarsContext) {
// Adds the "testHelper"
handlebarsContext.registerHelper('testHelper', function(param, options) {
return "Output from testHelper : " + param;
});
}
}
```
## Building the code
```bash
git clone the repo
npm i
npm i -g gulp
gulp
```
This package produces the following:
* lib/* - intermediate-stage commonjs build artifacts
* dist/* - the bundled script, along with other resources
* deploy/* - all resources which should be uploaded to a CDN.
Each file URL must be on its own line, and placed in the desired order. The scripts will be loaded asynchronously, but in a sequential fashion, which means that the WebPart will wait until a script is completely loaded before proceeding to load the next one.
#### Including custom logic files
If you need custom logic files that can interact precisely **before** or **after** the rendering of the HTML generated by the *Handlebars* template, you must follow the patern below in order for the WebPart to recognize the endpoints and call them when needed :
```javascript
ReactContentQuery.ExternalScripts.MyScriptFile = {
onPreRender: function(wpContext, handlebarsContext) {
// Do someting before rendering (ie: adding a custom block helper)
},
onPostRender: function(wpContext, handlebarsContext) {
// Do something after rendering (ie: calling a plugin on the generated HTML)
}
}
```
Looking at this example, here are the key things that needs to be respected in order for the file to work :
_Namespace_
- [x] The script uses a namespace which starts by **ReactContentQuery.ExternalScripts.**, followed by the name of its own file
- [x] The name of the file has to be written without its **.js** extension, and without any caracters that aren't letters or numbers
- [x] The name of the file needs to respect the same casing as in it's URL
Examples :
*https://www.mysite.com/MyScript.js*
```javascript
ReactContentQuery.ExternalScripts.MyScript {
...
}
```
*https://www.mysite.com/_My-Funky*named*Script_.js*
```javascript
ReactContentQuery.ExternalScripts.MyFunkynamedScript {
...
}
```
_Functions_
- [x] The script implements the **onPreRender** function for code that has to be executed before rendering
- [x] The scripts implements the **onPostRender** function for code that has to be executed after rendering
Both functions provide the following parameters :
Parameter | Description
----------------------|-------------
**wpContext** | Represents the context of the WebPart who called the function, which exposes all kinds of usefull informations such as **wpContext.domElement** which represents the HTML element on which the current WebPart is being rendered.
**handlebarsContext** | Represents the handlebars context used for generating the template of the current WebPart. Can be used for adding handlebar block helpers in the **onPreRender** function for example.
#### Including custom block helpers
Custom *block helpers* that can be used directly within the *Handlebars* template can be added simply by using a custom logic script file that implements the **onPreRender** function.
Example:
*https://www.mysite.com/MyCustomBlockHelper.js*
```javascript
ReactContentQuery.ExternalScripts.MyCustomBlockHelper = {
onPreRender: function(wpContext, handlebarsContext) {
// Adds the "testHelper"
handlebarsContext.registerHelper('testHelper', function(param, options) {
return "Output from testHelper : " + param;
});
}
}
```
## Building the code
```bash
git clone the repo
npm i
npm i -g gulp
gulp
```
This package produces the following:
* lib/* - intermediate-stage commonjs build artifacts
* dist/* - the bundled script, along with other resources
* deploy/* - all resources which should be uploaded to a CDN.