|
|
||
|---|---|---|
| .. | ||
| assets | ||
| azure-function/ProvisioningApp | ||
| webpart | ||
| .gitignore | ||
| README.md | ||
README.md
Site Provisioning Manager
Summary
This sample shows how you can manage site provisioning by calling Azure functions.
You can also find out how you can use React Hooks to manage the state of your application and share data across all components.
Compatibility
![]()
![]()
![]()
![]()
![]()
![]()
![]()
Applies to
Solution
| Solution | Author(s) |
|---|---|
| react-site-provisioning-manager | Ramin Ahmadi |
Version history
| Version | Date | Comments |
|---|---|---|
| 1.0 | August 14, 2019 | Initial release |
Features
This sample illustrates the following concepts on top of the SharePoint Framework:
- Using React Hooks.
- Using aadHttpClientFactory to call Azure functions.
- PnP/graph to call Microsoft Graph Api.
Configure Azure Function
Create a self signed certificate
- Run below command using Create-SelfSignedCertificate.ps1 in powershell-scripts folder.
.\Create-SelfSignedCertificate.ps1 -CommonName "NAME" -StartDate 2019-08-11 -EndDate 2025-08-11 -Password (ConvertTo-SecureString -String "PASSWORD" -AsPlainText -Force)
The dates are provided in US date format: YYYY-MM-dd Don't forget to update the PASSWORD and NAME.
Publishing the Azure function app
Follow below steps in order to publish the functions:
- Open Provisioning App solution with Visual Studio 2017/2019.
- Copy the .pfx certificate you generated under the Cert folder.
- Open ProvisioningApp.csproj in a text editor and make sure your cert name is included. If not, replace provisioningapp.pfx with your cert file name.
- In Solution Explorer, right-click the project and select Publish.
- In the Pick a publish target dialog, use the publish options as specified in the table below the image:
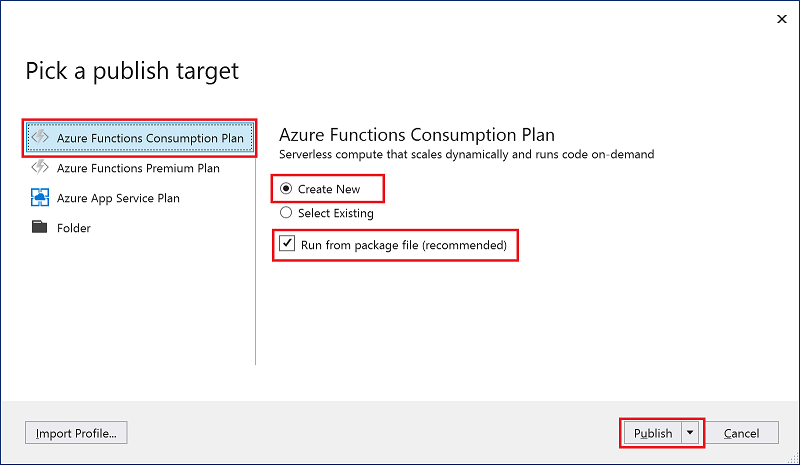
- Select Publish. If you haven't already signed-in to your Azure account from Visual Studio, select Sign-in.
- In the App Service: Create new dialog, enter the hosting settings.
- Select Create to create a function app and related resources in Azure with these settings and deploy your function project code.
Setting up an Azure AD app for app-only access
Create a new app registration in Azure AD
- Open Azure Portal https://portal.azure.com.
- Click on Azure Active Directory.
- Click on App registrations.
- Click on New registration.
- Give youre registration a name.
- Click Register.
Add your certificate to the app registration
- Open Azure Portal https://portal.azure.com.
- Select Azure Active Director, App Registration and then the App your created in previous steps.
- Click on "Certificates & secrets".
- Click on the "Upload certificate" button.
- Select the .CER file you generated earlier and click on "Add" to upload it.
API permissions
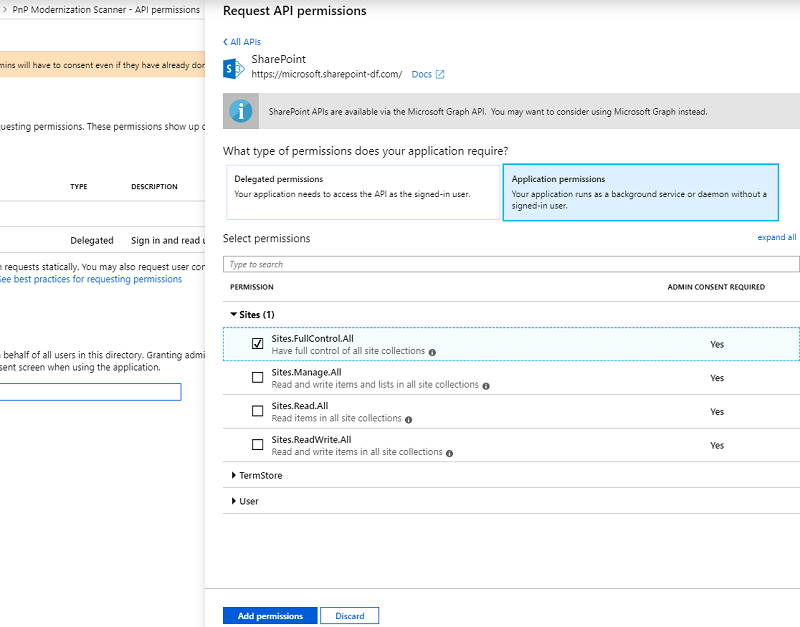
- In the app registration we created earlier, click on API Permissions.
- Click on the "Add a permission" button.
- Choose the following permissions:
- SharePoint -> Application permissions -> Sites -> Sites.FullControl.All
- Click Add permissions to save
- Click Grant admin consent for the permissions to come into effect.
Add the user_impersonation scope
Still in your Azure AD app, do the following:
- Click on Expose API.
- Click on Add scope
- Approve the suggested URL or change it, if you like.
- Fill in the following info:
- Scope name:
user_impersonation - Admin consent display name:
Access YourAzureAdAppDisplayName - Admin consent description:
Allow the application to access YourAzureAdAppDisplayName on behalf of the signed-in user.
- Press Add scope to save.
Securing the Azure function app
- Open Azure Portal https://portal.azure.com.
- Click App Services and find the app you created earlier.
- Click "Platform features" tab.
- Under Networking, click "Authentication / Authorization".
- In the option “App Service Authentication”, select “ON”.
- For "Action to take when request is not authenticated" option, select “Log in with Azure Active Directory”.
- Under “Authentication Providers”, select “Azure Active Directory”.
- Select “Management mode” as Express.
- Select the Azure AD app we registered earlier.
- Click OK and then Save.
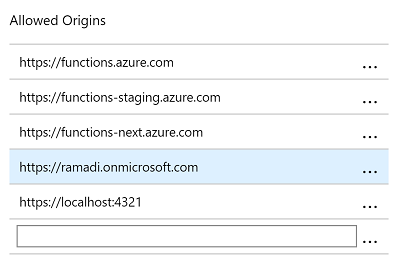
Enable CORS on Azure Function
- Click Platform features.
- Under API, click CORS.
- Specify the Office 365 tenant domain url and SharePoint local workbench url.
- Click Save.
Update App Settings
- Go the
App Settingspage of the Azure functions. - Create new key/value entries under ‘App settings’ as per the following table:
| Key | Value | Note |
|---|---|---|
| CERTIFICATE | .pfx file name | you should copy .pfx file in Cert folder |
| PASSWORD | Password you set for the certificate file | |
| CLIENTID | Application Registration Client ID | you can find the client id from overview tab |
| TENANT | e.x. contoso.onmicrosoft.com |
Installing the web part
In the package-solution.json, replace the value of resource (under webApiPermissionRequests) with the name of your Azure AD app registration.
On the command line run (when in webparts dir):
npm installgulp bundle --shipgulp package-solution --ship- Drop the .sppkg file under
sharepoint\solutionto your tenant app catalog. - Approve the API permissions via the new SharePoint admin center.
Configuring the web part on a page
Open the web part configurations and set the values:
- Application Id/EndPoint: the client ID of the Azure AD app registration used for authentication
- Get provisioning function URL: Go to the Azure functions in Azure portal and click on "GetProvisioningTemplate" and then "Get function Url". Copy-paste that value in this field.
- Apply provisioning function URL: Go to the Azure functions in Azure portal and click on "ApplyProvisioningTemplate" and then "Get function Url". Copy-paste that value in this field.