10 KiB
有关本文档的快速链接,请参考页面提示:
| 链接名称 | URL | 内容说明 |
|---|---|---|
| GitHub MD 源代文件 | https://github.com/cwiki-us-docs/cwikius-docs/blob/master/jwt/README.md | 将本页面中的内容转换为 MD 文件的手册,并存于 Github 上面 |
| Docsify 转换后的手册 | https://cwiki-us-docs.github.io/cwikius-docs/#/jwt/README | 将 MD 文件使用 Docsify 转换后的手册链接地址 |
| 问题讨论和社区 | https://www.ossez.com/tag/jwt | 请访问使用 JWT 标签 |
| CWIKI.US 页面链接 | https://www.cwiki.us/display/CWIKIUSDOCS/JWT+-+JSON+Web+Token | Confluence 平台的原始翻译文件更新地址 |
NEW: 获得 免费的 JWT 手册(JWT Handbook) 同时学习更多有关 JWT 的内容!
什么是 JSON Web Token(JWT)
JSON Web Token (JWT) 作为一个开放的标准 (RFC 7519) 定义了一种简洁自包含的方法用于通信双方之间以 JSON 对象的形式安全的传递信息。因为有数字签名,所以这些通信的信息能够被校验和信任。
JWT 可以使用秘钥(secret)进行签名 (使用 HMAC 算法) 或使用 RSA 或 ECDSA 算法的公钥/私钥对(public/private key)。
尽管 JWT 可以在通讯的双方之间通过提供秘钥(secret)来进行签名,我们将会更多关注 **已签名(signed)**的 token。
通过签名的令牌可以验证其中数据的 完整性(integrity) ,而加密的令牌可以针对其他方 隐藏(hide) 申明。
当令牌(token)使用 公钥/私钥对(public/private key)进行签名的时候,只有持有私钥进行签名的一方是进行签名的。
关键术语的中英文对照
- token - 令牌
- secret - 秘钥
- signature - 签名
- claims - 要求或者数据
什么时候应该使用 JSON Web Tokens
在下面的一些场景中 JSON Web Tokens 可比较有用:
-
认证鉴权(Authentication): 这是 JWT 最常见的应用场景。一旦用户成功登入,在随后的每次请求中都将会包含JWT信息。 通过JWT的验证机制后,将允许该用户访问路由(routes)、服务(services)以及该Token所允许的资源。因为 JWT 的开销非常小,使其非常容易在跨域环境下使用,现如今 JWT 被广泛应用到单点登录(Single Sign On)中。
-
信息交换(Information Exchange): 因为 JSON Web Tokens 是可以进行签名的,因此 JWT 能够在不同系统之间安全的传递信息。
例如基于使用公钥/私钥对(public/private key pairs),你可以确保请求的发送者是可信的。
同时,因为头部(header)和负载(payload)的信息和内容都参与了计算,所以你可以验证内容是否被篡改过。
JSON Web Token 的结构是什么?
JSON Web Tokens 由使用 (.) 分开的 3 个部分组成的,这 3 个部分分别是:
- 头部(Header)
- 负载(Payload)
- 签名(Signature)
正是因为上面的组织形式,因此一个 JWT 通常看起如下面的表现形式。
xxxxx.yyyyy.zzzzz
让我们针对上面的形式来具体的分析下。
头部(Header)
在头部的数据中 通常 包含有 2 部分的内容:token 的类型,这里使用的是字符 JWT,和使用的的签名加密算法,例如 SHA256 或者 RSA。
例如下面的格式:
{
  "alg": "HS256",
  "typ": "JWT"
}
然后,将上面的 JSON 数据格式使用 Base64Url 算法进行哈希,这样你就得到了 JWT 的第一部分。
负载(Payload)
JWT 的第二部分为负载,在负载中是由一些 claims 组成的。 Claims 是一些实体(通常指用户)和其他的一一些信息。 有下面 3 种类型的 claims registered, public 和 private 。
-
Registered claims: These are a set of predefined claims which are not mandatory but recommended, to provide a set of useful, interoperable claims. Some of them are: iss (issuer), exp (expiration time), sub (subject), aud (audience), and others.
Notice that the claim names are only three characters long as JWT is meant to be compact.
-
Public claims: These can be defined at will by those using JWTs. But to avoid collisions they should be defined in the IANA JSON Web Token Registry or be defined as a URI that contains a collision resistant namespace.
-
Private claims: These are the custom claims created to share information between parties that agree on using them and are neither registered or public claims.
An example payload could be:
{
  "sub": "1234567890",
  "name": "John Doe",
  "admin": true
}
The payload is then Base64Url encoded to form the second part of the JSON Web Token.
Do note that for signed tokens this information, though protected against tampering, is readable by anyone. Do not put secret information in the payload or header elements of a JWT unless it is encrypted.
Signature
To create the signature part you have to take the encoded header, the encoded payload, a secret, the algorithm specified in the header, and sign that.
For example if you want to use the HMAC SHA256 algorithm, the signature will be created in the following way:
HMACSHA256(
  base64UrlEncode(header) + "." +
  base64UrlEncode(payload),
  secret)
The signature is used to verify the message wasn't changed along the way, and, in the case of tokens signed with a private key, it can also verify that the sender of the JWT is who it says it is.
Putting all together
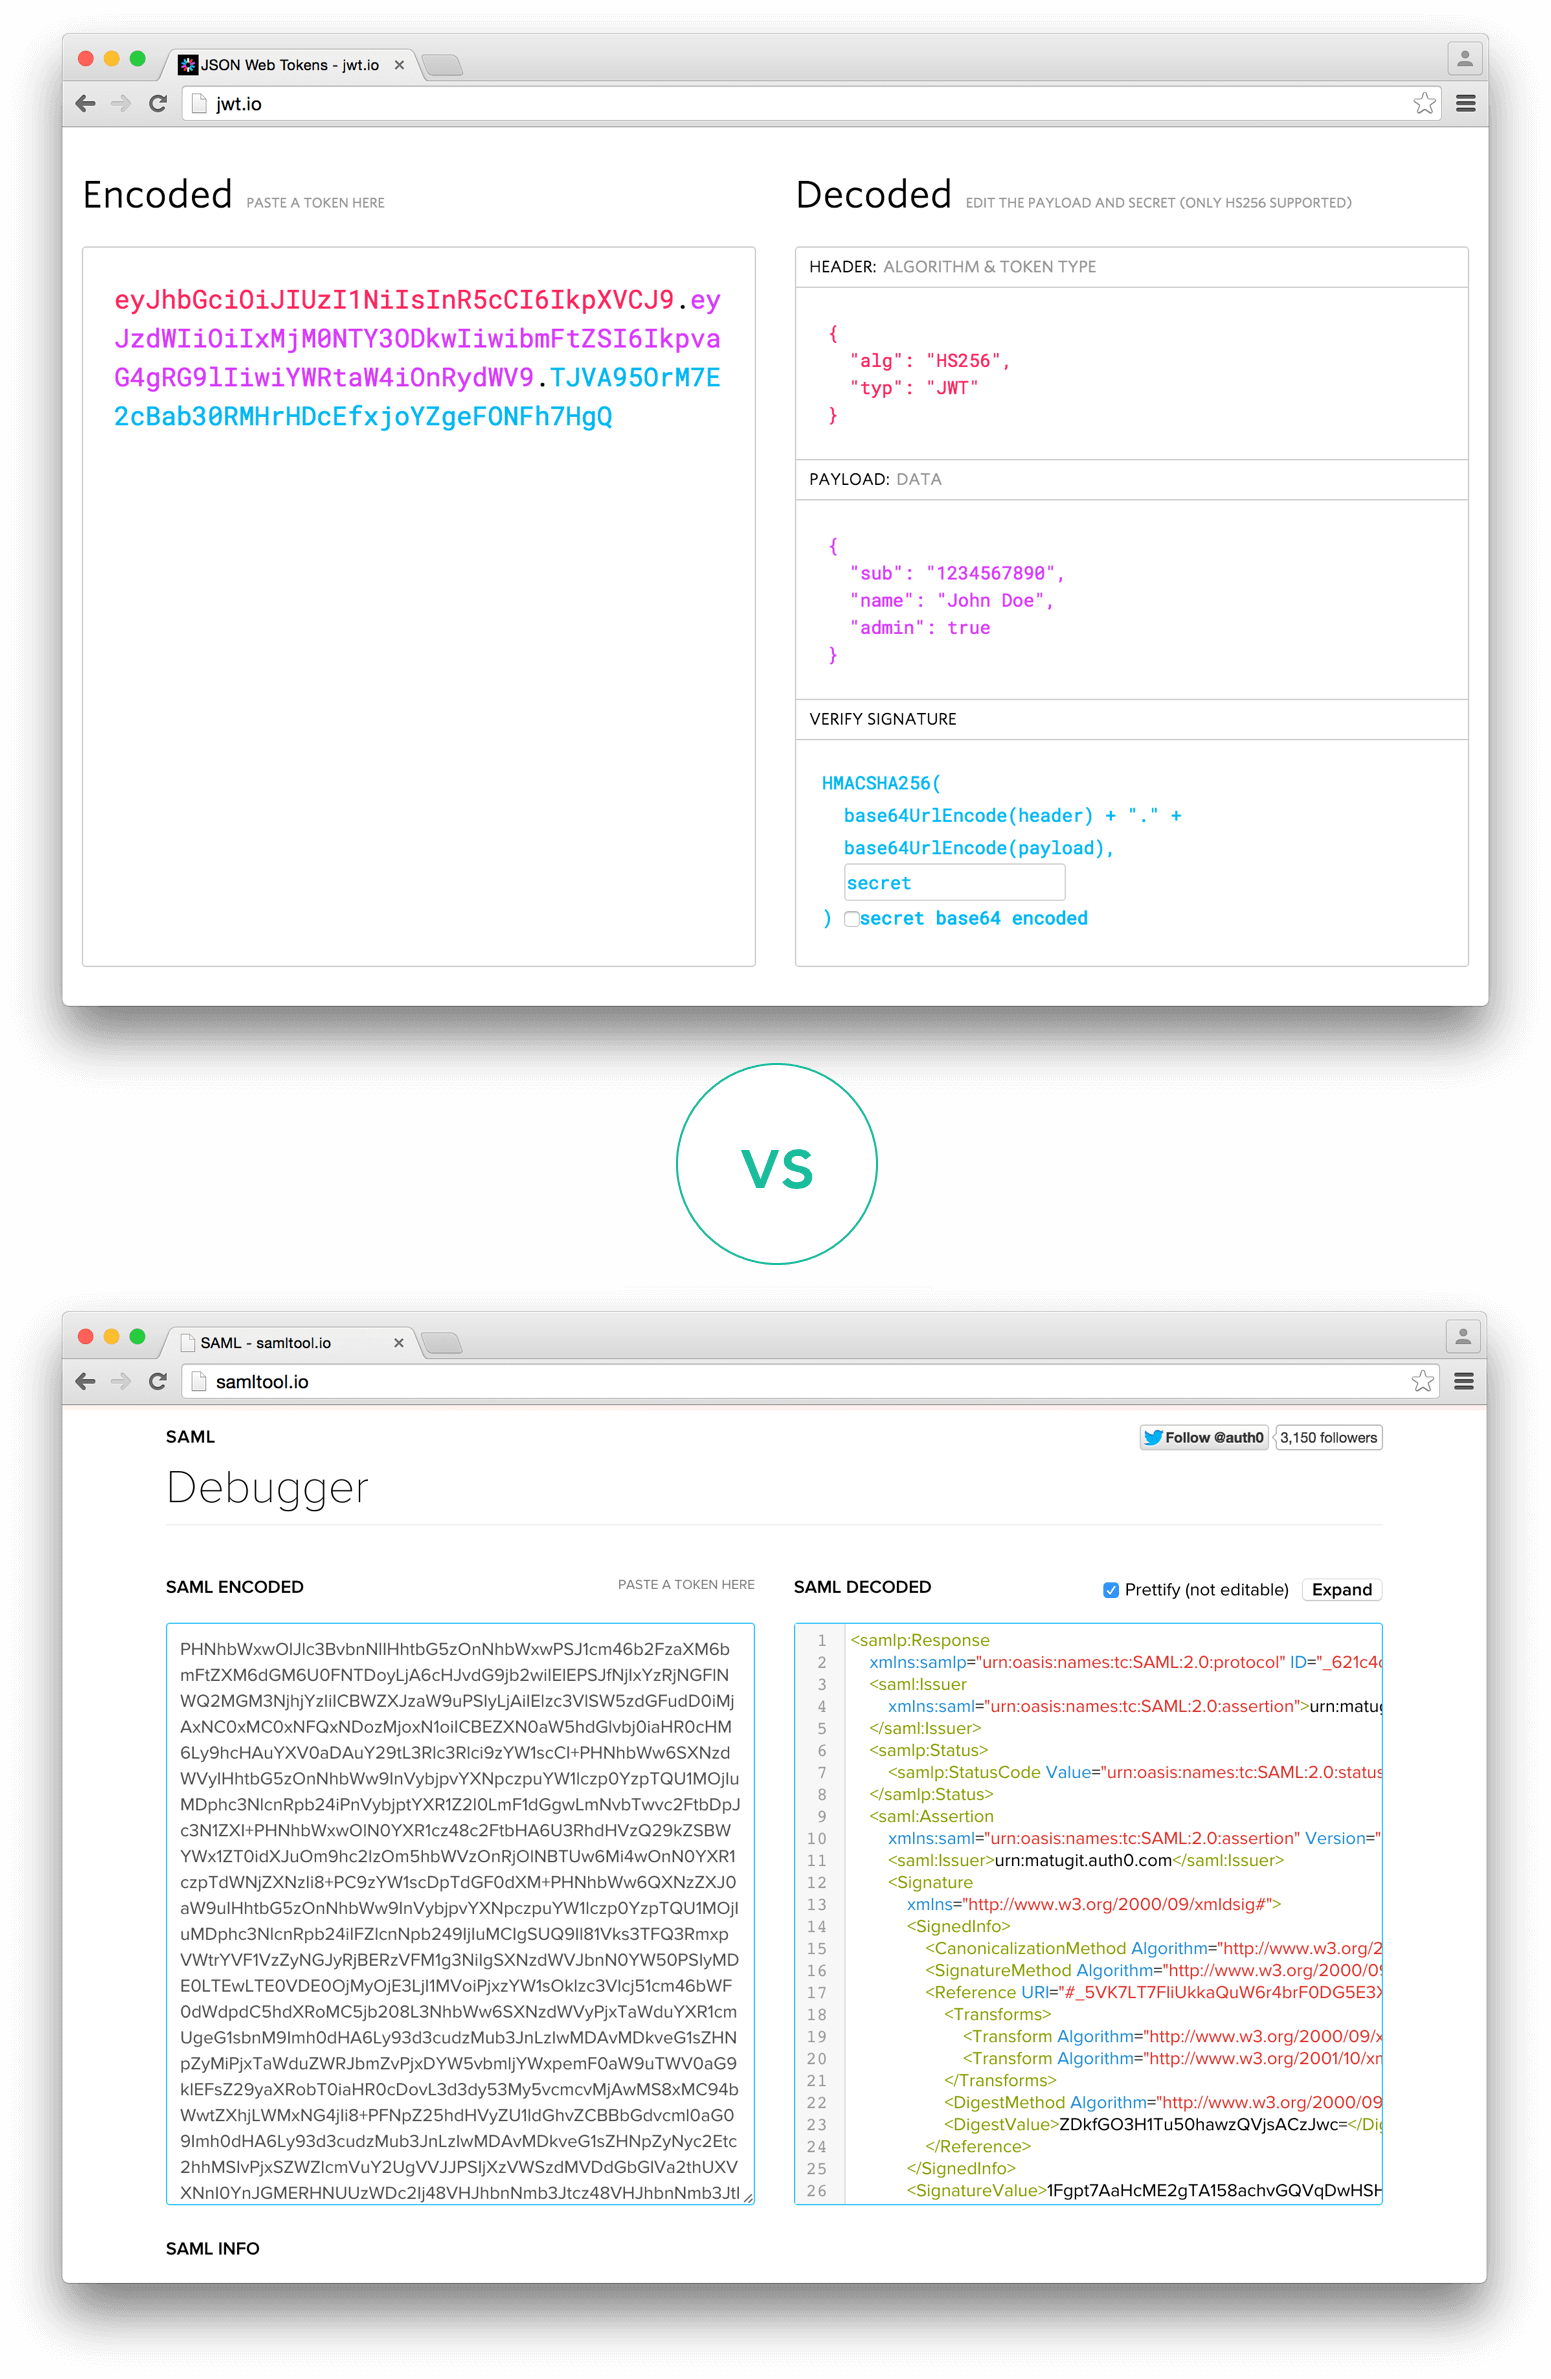
The output is three Base64-URL strings separated by dots that can be easily passed in HTML and HTTP environments, while being more compact when compared to XML-based standards such as SAML.
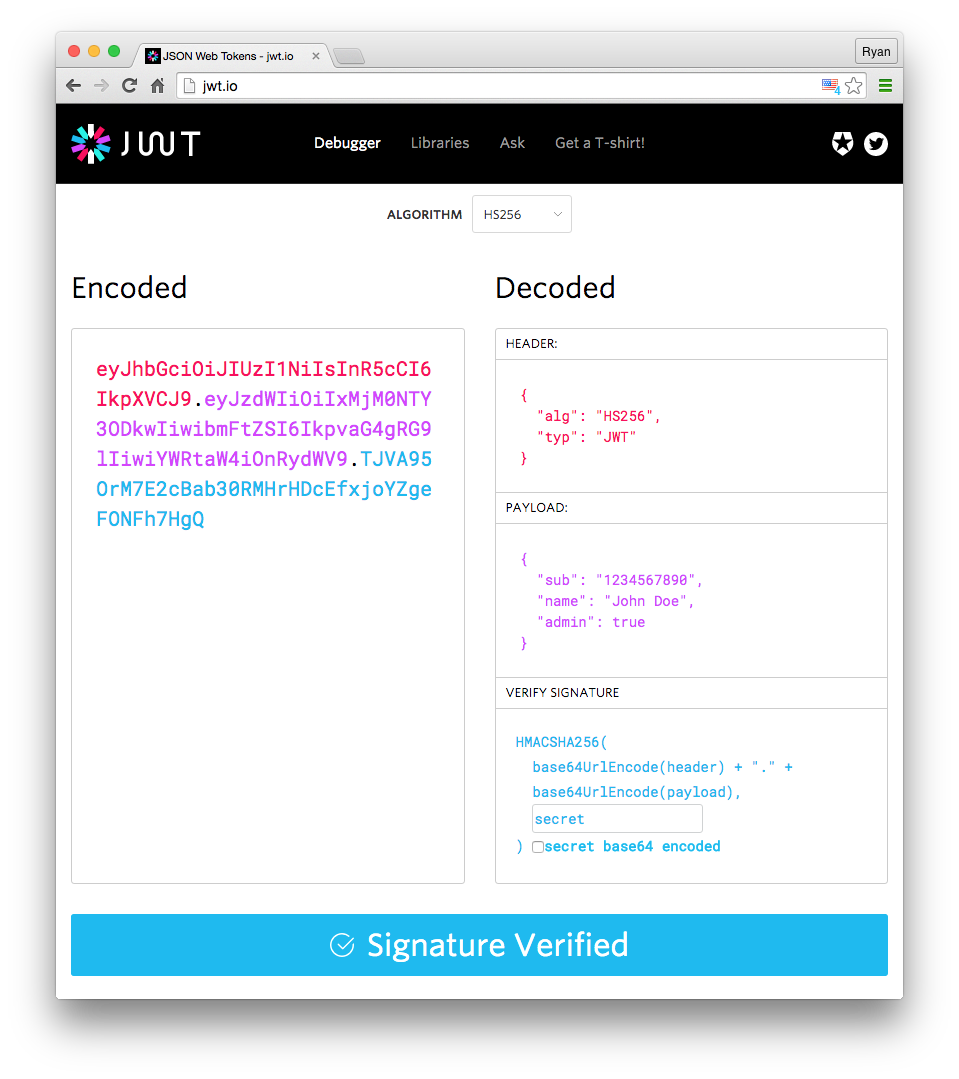
The following shows a JWT that has the previous header and payload encoded, and it is signed with a secret.

If you want to play with JWT and put these concepts into practice, you can use jwt.io Debugger to decode, verify, and generate JWTs.
How do JSON Web Tokens work?
In authentication, when the user successfully logs in using their credentials, a JSON Web Token will be returned. Since tokens are credentials, great care must be taken to prevent security issues. In general, you should not keep tokens longer than required.
You also should not store sensitive session data in browser storage due to lack of security.
Whenever the user wants to access a protected route or resource, the user agent should send the JWT, typically in the Authorization header using the Bearer schema. The content of the header should look like the following:
Authorization: Bearer <token>
This can be, in certain cases, a stateless authorization mechanism. The server's protected routes will check for a valid JWT in the Authorization header, and if it's present, the user will be allowed to access protected resources. If the JWT contains the necessary data, the need to query the database for certain operations may be reduced, though this may not always be the case.
If the token is sent in the Authorization header, Cross-Origin Resource Sharing (CORS) won't be an issue as it doesn't use cookies.
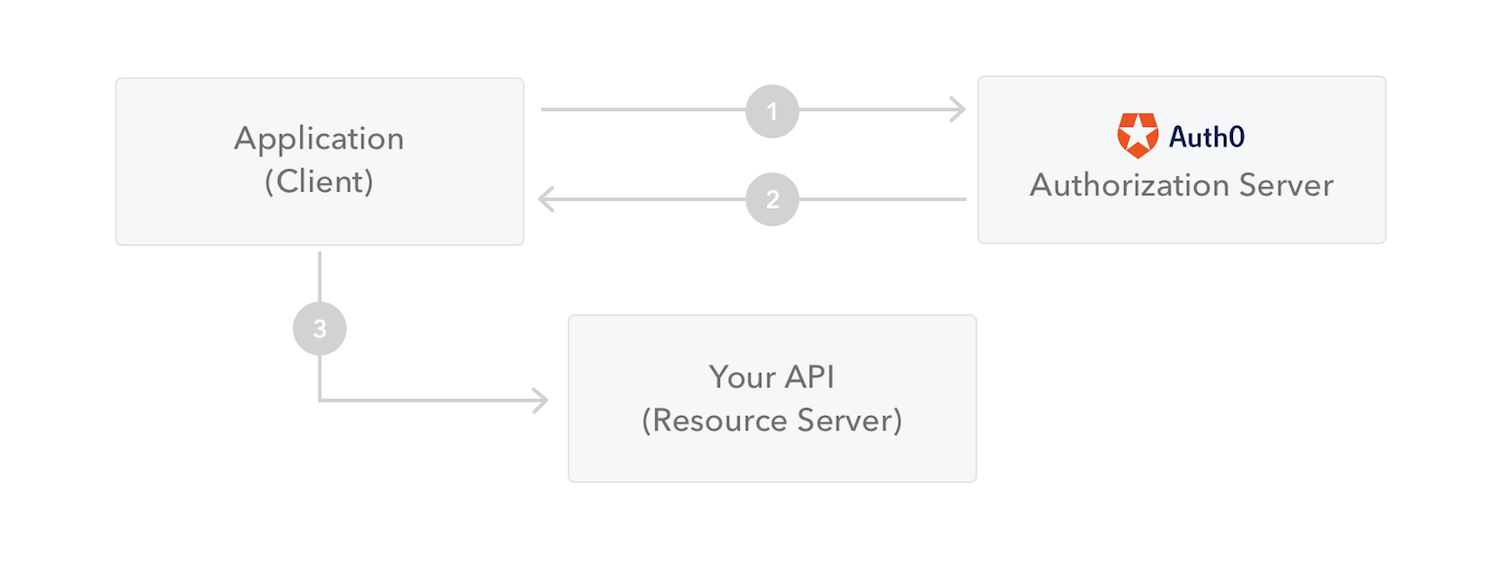
The following diagram shows how a JWT is obtained and used to access APIs or resources:
- The application or client requests authorization to the authorization server. This is performed through one of the different authorization flows. For example, a typical OpenID Connect compliant web application will go through the
/oauth/authorizeendpoint using the authorization code flow. - When the authorization is granted, the authorization server returns an access token to the application.
- The application uses the access token to access a protected resource (like an API).
Do note that with signed tokens, all the information contained within the token is exposed to users or other parties, even though they are unable to change it. This means you should not put secret information within the token.
Why should we use JSON Web Tokens?
Let's talk about the benefits of JSON Web Tokens (JWT) when compared to Simple Web Tokens (SWT) and Security Assertion Markup Language Tokens (SAML).
As JSON is less verbose than XML, when it is encoded its size is also smaller, making JWT more compact than SAML. This makes JWT a good choice to be passed in HTML and HTTP environments.
Security-wise, SWT can only be symmetrically signed by a shared secret using the HMAC algorithm. However, JWT and SAML tokens can use a public/private key pair in the form of a X.509 certificate for signing. Signing XML with XML Digital Signature without introducing obscure security holes is very difficult when compared to the simplicity of signing JSON.
JSON parsers are common in most programming languages because they map directly to objects. Conversely, XML doesn't have a natural document-to-object mapping. This makes it easier to work with JWT than SAML assertions.
Regarding usage, JWT is used at Internet scale. This highlights the ease of client-side processing of the JSON Web token on multiple platforms, especially mobile.
 Comparison of the length of an encoded JWT and an encoded SAML
If you want to read more about JSON Web Tokens and even start using them to perform authentication in your own applications, browse to the JSON Web Token landing page at Auth0.

